First things first: this project has been officially dubbed (and pardon my klatchian) The Shit Corset. Not because it’s badly made, per se, but for more literal reasons: in the late construction phases my kitties decided it would make for a perfect addition to their litter box, and I woke up one not-so-fine morning to a missing project… and then, once it was found, a very smelly, dirty one.
Ouch!
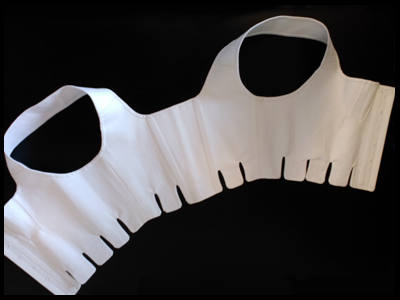
A full view of the finished corset.
It’s gone through more washing cycles than most clothes do in their lifespan.
It still looks -to me- slightly yucky.
Double ouch!
Here are some construction notes and ideas:
Pattern: Nehelenia Pattern’s E400 Early 19th C. Short Stays
Year: c.1800, aspires to be earlier.
Fabric & notions: white cotton coutil (~1m), steel (72cm) and wire (34cm) boning, appropriate end caps, cotton bias tape (~1.3m), silk embroidery thread.
How historically accurate is it? 75% for patterning, some materials and hand-sewing.
Hours to complete: 20+ over a few weeks.
First worn: n/a
Total cost: 36€, as I bought the entire kit from Nehelenia’s store and all other odds and ends came from the stash. To be fair I should only assign half of those costs, as the seller is not stringy at all with materials and I could make a second pair of stays with the spares! I probably will, actually, applying what I’ve learnt here.
This was a big “firsts” project for me. It’s been my first time working on proper corsetry, my first proper gussets, and my first hand-sewn eyelets. I wanted to keep things simple when I started, which is why I chose to follow a pre-made pattern. The only “special” point would be the tabs, which I knew I didn’t want to edge in bias tape as the instructions called for.

V&A transitional stays.
I love the pointy ends, but they’d have been very hard for me to run in coutil!
Once I found Festive Attyre’s earlier transitional stays with unedged tabs I knew what I wanted. Turning coutil is a nightmare so I settled on rounded tabs. While fitting the mockup I also changed the size and shape of the tabs, making them irregular but mirrored on both sides.
Nehelenia’s pattern is pretty good, but the English instructions are sparse and require some previous sewing experience. The pattern calls for two layers of coutil, which gives enough support for the bust. It works nicely, but next time I’ll add an extra lining of something softer and cotton-y to protect the inner stitching from wear and tear.
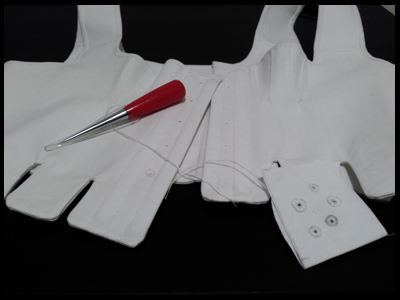
I was expecting the gussets to be a sewing nightmare, but they were honestly quite nice to work on! I debated on using this wonderful hack by Sempstress… but in the end I went with proper, time-consuming, fingertip-murdering techniques. Luckily for me, the Oregon Regency Society has a wonderful and easy to follow gusset-and-cups setting tutorial.

Pretty gusset vs ugly gusset, fight!
(Upping the contrast on pictures really brings out the details.)
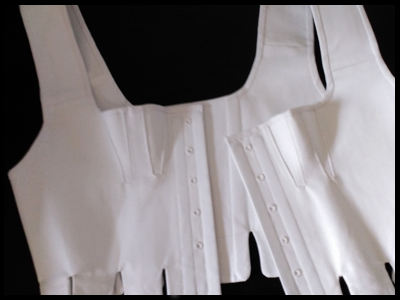
While the shoulder straps are quite fine with the modifications I made during the mockup phase (I had to make them smaller and set them closer together, as usual) it might have been better to separate the front from the straps and add some eyelets. It would have helped with a perfect fit.
The binding is set backwards. It really bugs me. I noticed it one night, and I thought, ‘Oh, tomorrow I’ll unstitch it and do it properly’, but that was the very night the Litter Incident happened. Afterwards I was too busy with disinfecting and washing and whatnot to remember… until it was too late and only the eyelets were left to be done. Oh, well!
What else? Oh! Because of the pull of the turned tabs and the modified straps there was some tension to the back that made it scrunch ever so slightly, so I decided to bone it, as many earlier transitional stays do. I could have used the spare boning provided, but I thought I’d rather save it and re-purpose the actual pieces from an UFO. It called for wider channels at the back than at the front, but it solved the problem.
My embroidery skills could be improved, but I was able to work the eyelets in a way that left them more or less even and balanced. I tried different techniques (there are some great tutorials here and here) before deciding on a style – a simple outward buttonhole stitch. It’s not the most adequate eyelet for this kind of garment, but it’s the only one I could achieve consistent results in.
My practice attempts & the first eyelet actually on the corset.
So fiddly ![]()
All things considered, I’m quite happy with the result – visible bias stitching and all. I’ve learnt a lot (esp. about cat safety) and I’ve started to un-fear corsetry techniques. I’m actually quite excited to try making this pattern’s basic Regency view!
Tiny eyelets! The in-package cord is too thick so I need to get a narrower cord some time.
Also: behold the power of phone photography ![]()
